FRANKENSTEIN MEAT GRINDER
I have processed the deer I have harvested since the late 1970s when the
weather was cold enough and during archery season, I would have local
processors to process the deer until the
year 2002. That year on opening
archery day, (09-07-2002) I
took a archery harvested 9 point buck to one of our local processors and
his freezer went bad and the only thing I got out of that buck was a
picture and a set of antlers, of which I mounted on a wooden plack.
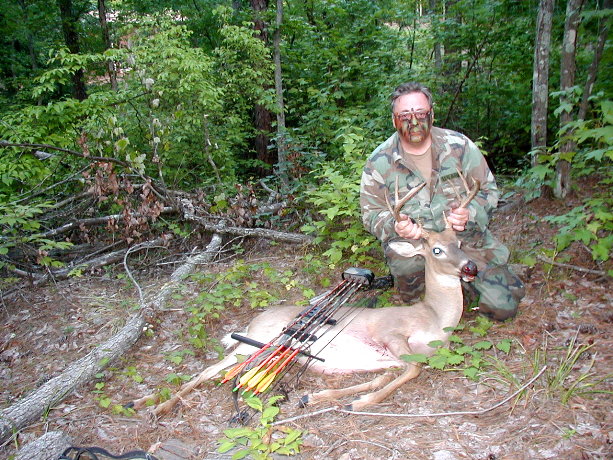
I asked the deer processor if he would do me right on the next deer
since I had no meat to show for that harvest and
he hum hawed around with little or no response to my question, therefore I
purchased a used refrigerator to age the quartered up deer
until I de-boned, sliced and ground it, packaged and later vacuum sealed
all the wild game that I freeze along with other things as well.
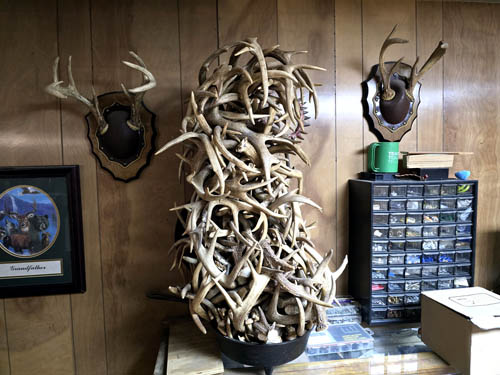
The deer plack on the upper left is the 9 point buck. That is a
pile of buck antlers in my deer horn stew pot harvested over the decades with
the venison ending up in our freezers! I have used a few of the antlers
for knife handles.
With said introduction, I will get to the meat and potatoes of this
short story and what prompted it.
The last two or three deer that I processed, I noticed my LEM-10
meat grinder which was made in Poland and sold by the Sausage Maker,
Inc. in Buffalo, NY that I purchased on 04-21-1998 which cost $
395.00 not counting shipping, had an unusual sound
to the motor and internal gear box and decided to get a back up grinder
going before it bit the dust.
Murphy's Law never sleeps.
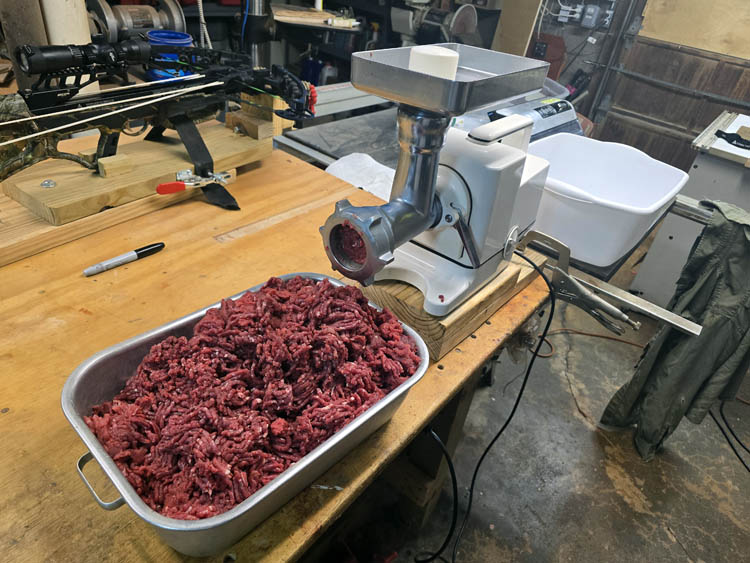
Above is pix of the antiquated meat grinder that is no longer
available from the Sausage Maker, Inc, and doubt you can find parts for
it either, other than the standard grinding plates and cutter knife.
One thing is for certain; I have definitely got my money's worth out
of this grinder since 1998!
I looked at the prices of the current meat grinders and needed one
that would adequately do the job for (home
usage) and prices ranged anywhere from 100
bucks to nearly a thousand
dollars or more and did not want to spend that amount of money.
I have learned over the many decades,
"Most of the time, you get what you pay for."
I guess frugal
comes to mind being a nice word for stingy, grin if you must!
However, after getting the Frankenstein meat grinder operational, I
don't think I was being too frugal in the long run!
Fellow Wadesboro Church of God member Bruce High of Marshville, NC said he had a grinder
that someone had given him and that person used it to grind up cabbage, etc. and
he decided to sell it to me for 75 dollars. However, when he went
to test it out, the shaft to grinder feed auger broke off where the chain
drive sprocket was attached. I told him I would still purchase it
and locate a feed auger for the Chop-Rite # 22 meat grinder.
FINISHED FRANKENSTEIN MEAT GRINDER
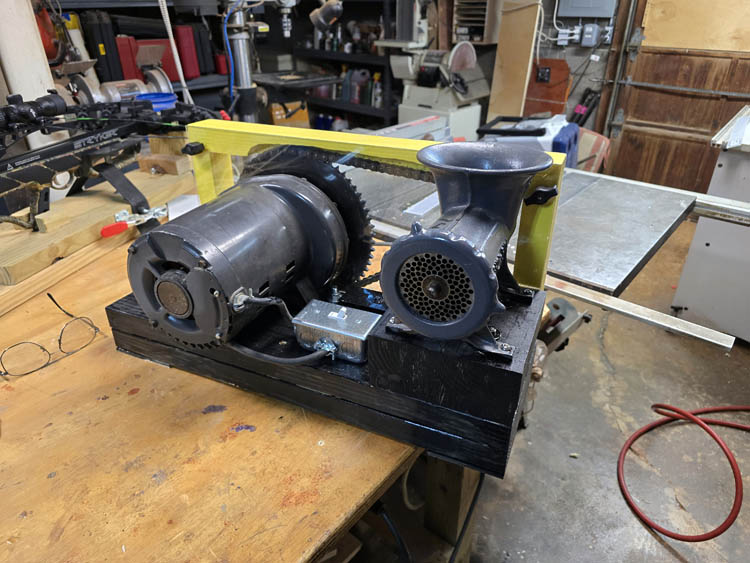
The above is the finished meat grinder SN 498 and below is a narrative with
pictures from start to finish on this project!
FRANKENSTEIN MEAT GRINDER SAGA
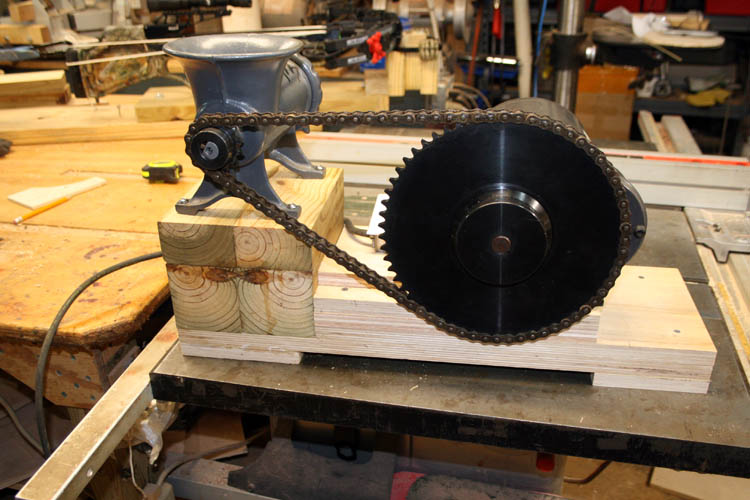
The meat grinder is not too pretty to look at, therefore I named it
Frankenstein. I will later do some sanding on the unit and
apply a coat of stain. Normally, hand cranked meat grinders such
as the Chop-Rite style that have been converted to motorized drive will
have a very large pulley on the grinder feed auger and a small pulley on
the motor to reduce the RPMs to the feed auger, but it wasn't necessary
with this gear box drive, but the other way to increase the RPM of the
feed auger, therefore the large pulley on the motor/gear box drive. Many have used direct drive motors
coupled to the feed auger which have a slow enough RPM.
I mounted the sprockets inward to give easy access to the set screws
and it was necessary on the large sprocket because of the location of
the woodruff key located on the motor/gear box shaft.
My only concern is the side torque and friction applied to the auger
since there is no bushing or bearing in the grinder housing, but simply
metal on metal which will require a good application of food grade
lubricant on the auger shaft with each usage. There is a fiber
washer that goes between the auger shaft and the housing to reduce friction
and wear when you tighten the large threaded ring which pushes the feed
auger to the rear and keeps the knife blade tight against the grinder
plate.
The Dayton motor with the gear box must weight fifty (50) pounds or
so it seems.
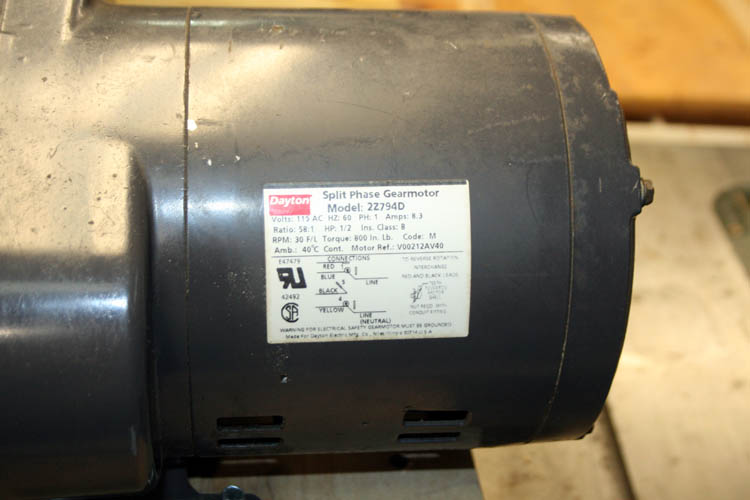
Above pix of the motor which has a reduction of around 58:1
ratio with the shaft turning at a very slow 30 RPM. That
speed is way too slow to grind meat and my current LEM-10 meat grinder
runs at around 211 RPM on the high speed setting which does an
excellent job.
I needed to add a 9 inch diameter sprocket for the 3/4 inch diameter
shaft for a # 40 chain which had 60 teeth and located one. It was
a little pricy around 59 bucks, but needed it to increase the RPM on the
Chop-Rite # 22 meat auger to at least 135 RPM. I am hoping the
RPMs will be enough to not take too long a time to grind 20 to 40 pounds
of venison; will have to wait and see when I grind the next deer
harvested! Anyway, will have to live with it since to get above
200 RPM on the feed auger would require a much larger diameter
motor/gearbox sprocket and of course get a longer # 40 chain.
I ordered a Chop-Rite # 22 meat auger and had a friend Rodney Caudle
of Polkton, NC have shaft end turned down to 3/4 inch diameter for a 2
inch diameter # 40 sprocket which has 13 teeth.
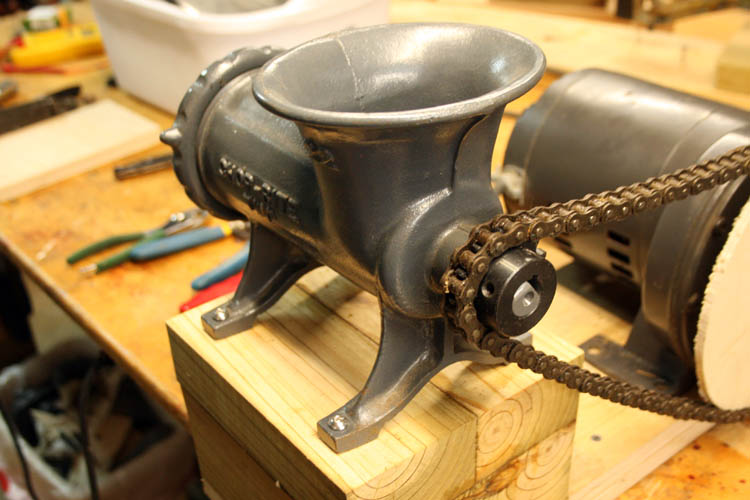
I did a test fit with a piece of 1/4 inch plywood to get an idea of
what elevation I needed on the wood base of the grinder. I also
wanted to know if there was enough existing chain, of which it was. I used
scrap aka unallocated birch plywood for the base and treated pine blocks
to elevated the Chop-Rite # 22 grinder. I wanted the grinder head
to be high enough off the table to allow a deep plastic freezer lug to
catch the ground meat. I used brass threaded inserts EZ Loc under the
grinder feet for 1/4 x 20 tpi stainless steel Allen socket head bolts.
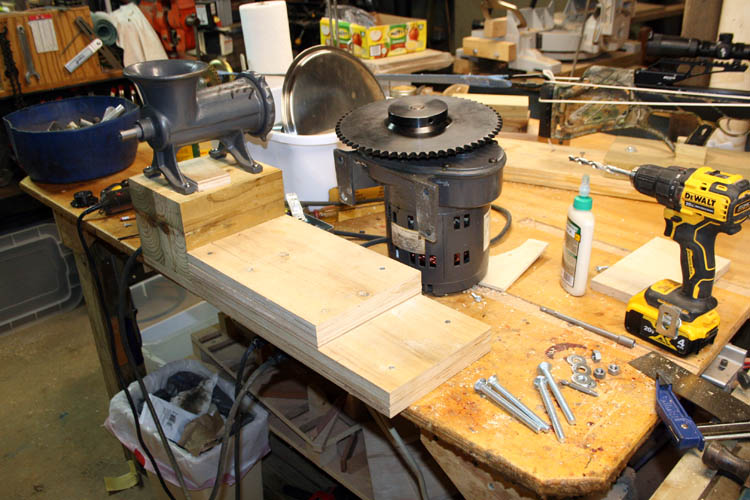
I used 3/8 x 4 inch carriage bolts, washers and nuts to secure the
motor/gearbox to the Birch plywood base.
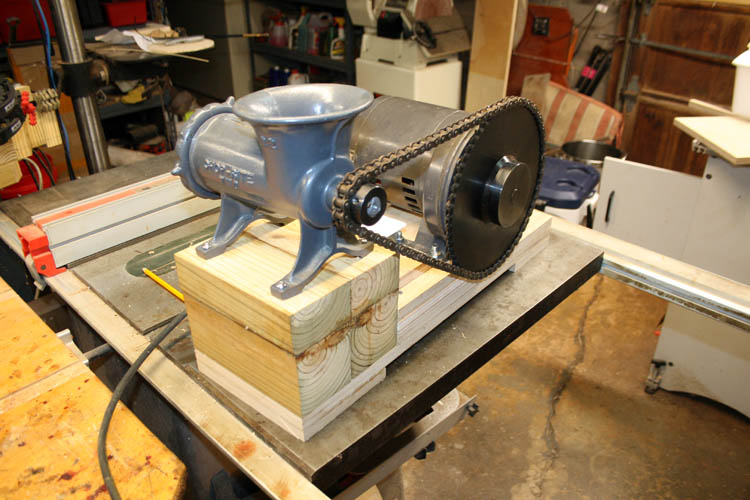
Another view of the Frankenstein Meat Grinder. With the exposed
sprocket teeth, this definitely will not be OSHA compliant!
I might make some type of wood guard for the chain and sprockets that
can be easily detached, if this unit works as expected!
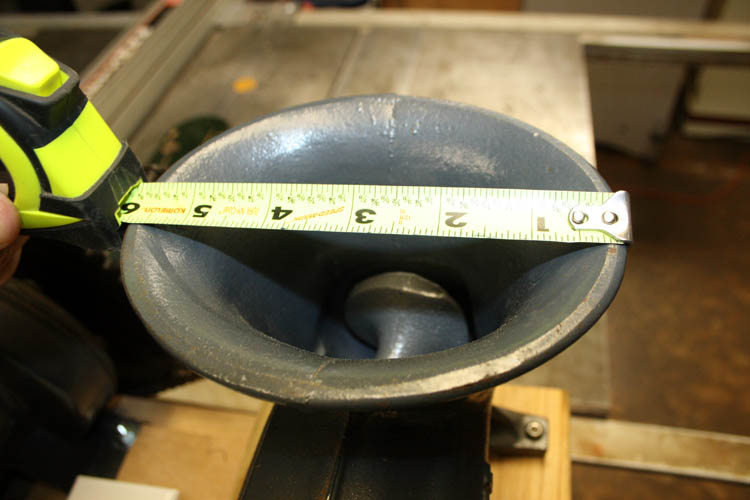
As evidenced by the above pix, you have a wide opening (throat) aka
hopper and can put
large cuts of meat into the grinder. When I grind my next deer, I
will get an idea of what size of meat the grinder will accommodate.
The exposed feed auger is definitely a safety hazard in my humble
opinion since it is motorized.
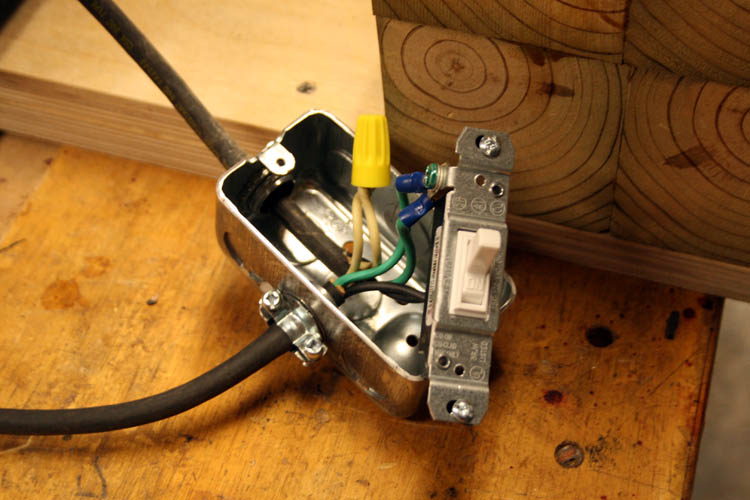
I wired an on/off switch to the motor and secured the switch box to
the base in front of the mounting blocks for the grinder.
I will give the grinder a field test with the next deer that I
harvest and decide to grind. To clean the grinder feed auger, I will remove the two set screws on
the grinder sprocket, pull the meat auger from the grinder and if
necessary remove the four (4) hold down bolts to the grinder body and
clean the entire grinder. It is not as convenient as turning one
knob or lever to detach a grinder head from the grinder motor, but this
will work, nevertheless. I believe the grinder body can be
adequately cleaned without removing it from the base unit.
This was a fun project and used what materials I had on hand and
parts purchased was approximately $ 327.71. I could have easily
purchased a decent/low-mid grade grinder for that amount, but this grinder
should have all the power needed (800 inch pounds) of torque with the
1/2 HP motor and the throat on the grinder body is large enough not to
worry about having to cut small chunks of meat to feed into it. As
stated earlier, there definitely is some safety issues with this unit.
I will add a review of this Frankenstein Meat Grinder when I get a
chance to use it, hopefully in the very near future.
TABLE BELOW - COST OF GRINDER
Web page uploaded by Bill aka Mickey Porter on 11-19-2024.
FRANKENSTEIN MEAT GRINDER REVIEW
I had a chance to use the Frankenstein meat grinder today
(12-02-2024) and for the most part well pleased. I ground 16.4
pounds of venison in 6.12 minutes and believe the speed of the feed
auger is adequate.

I need to make a heavier platform (base) to mount the grinder base
and the motor/gearbox where the base will not flex during operation when
the motor gets under a load which causes some slack in the # 40 chain, enough to
were it makes a racket.
CLEANING THE MEAT GRINDER
Cleaning the meat grinder was not a problem either. I loosened
the two set screws on the sprocket to the feed auger and simply pulled
the auger from the grinder housing. The meat grinder housing is
large enough diameter to easily clean it with removing it from the
mounting base.
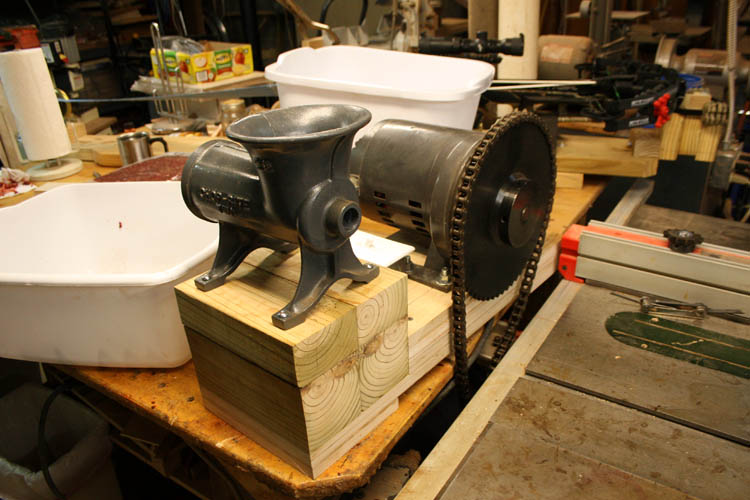
Above pix of the first version, of which the base had too much flex in
it due to the high torque of the motor/gear box.
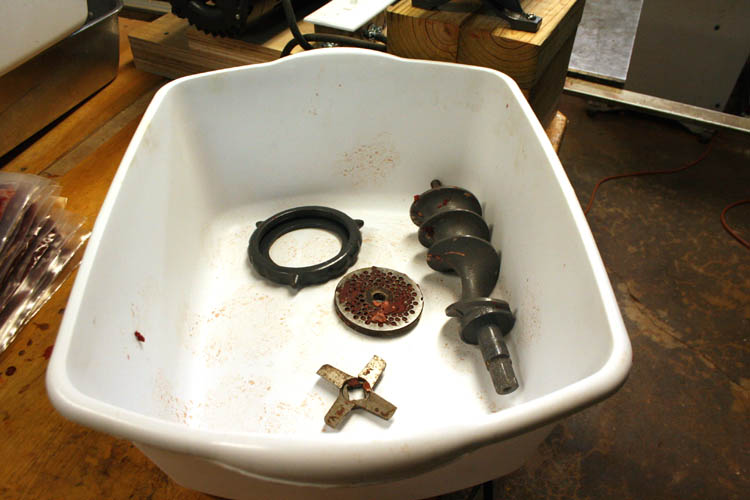
I took the meat grinder parts topside and washed them in the kitchen
sink and air drying them on paper towels. Before installing the
parts back into the meat grinder housing, I will lubricate them with
food safe lubricant.
NOTE: I had a piece of Birch 3/4 inch plywood that was
wedged between the feet of the gearbox/motor housing mounting bracket
and the base of the meat grinder, but it did not stay in place and will
replaced it with a piece of hardwood and screw it down, therefore it
should not move any. I did have some very large chunks of venison
that I was feeding into the Chop-Rite # 22 grinder auger/throat/hopper
and the meat was partly frozen and sure that helped attribute to the
base of the motor/gearbox moving forward some causing the slack in the
chain.
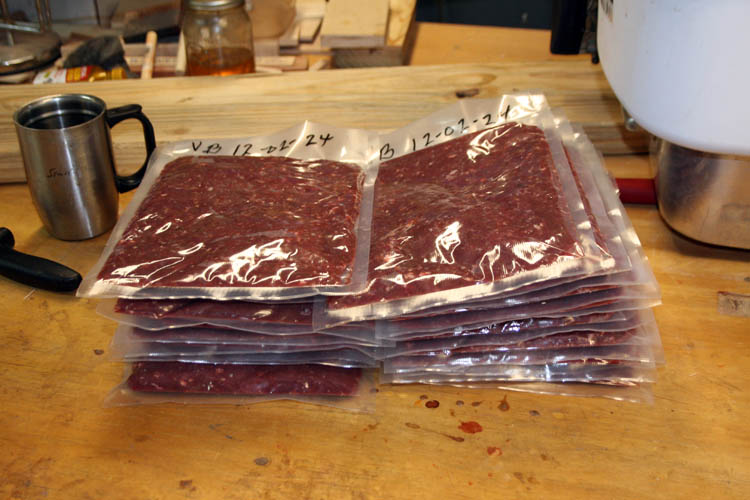
With this batch of ground venison, I flattened out each package which
makes it easier to store taking up less room in the freezer.
Another big plus, when you thaw a package out, it takes far less time to
thaw.
Web page updated by Bill aka Mickey Porter on 12-02-2024.
REMADE THE BASE SECTION
I used a couple lengths of pine 2 x 8 x 24 inches in length, which is
actually 1.5 x 7 x 24 inches and glued and screwed the two pieces
together. After allowing to dry a while, I cut the base that holds
the meat grinder down to 3 inches in height and cut about 1/2 inch +-
from the side of the base opposite the sprocket of the feed auger to
match the width of the pine board(s) base.
The block base that holds the meat grinder was drilled to accept 3/8
x 5 inch hex head lag screws and used a total of four and mounted the
block grinder base to the base boards. Holes were drilled the
appropriate size for the body of the lag screws into the mounting block
and for the screw
portion of the lag screws that go into the base of the unit.
After securing the grinder base block, the motor/gearbox was
positioned and clamped in place to mark the holes for the 3/8 x 4 inch
carriage bolts with the chain in place and proper tension applied to the
chain from the motor/gearbox sprocket to the feed auger sprocket.
After marking with pencil and black paint, the holes were drilled.
A hardwood block the appropriate length was fitted between the
motor/gearbox base and the block base of the grinder to keep everything
secured in place and the carriage bolts were tightened down. I
screwed the small hardwood block between the grinder base and the base
of the motor/gearbox to prevent the motor/gearbox from trying to move
toward the grinder base under load. The four carriage bolts
tightened down should have been enough, but wanted a little extra margin
of stability. The rotation of the grinder feed auger is clockwise
when looking at the shaft end of the feed auger.
I did a test run and everything was properly aligned and the carriage
bolt nuts were pulled down tight. I used a piece of 3/16 inch
Birch plywood glued at each end of the base board since the carriage bolt heads were not
countersinked. I could have countersinked the heads of the
carriage bolts, but would have to shorten the length of a couple of them
and took the easier route.
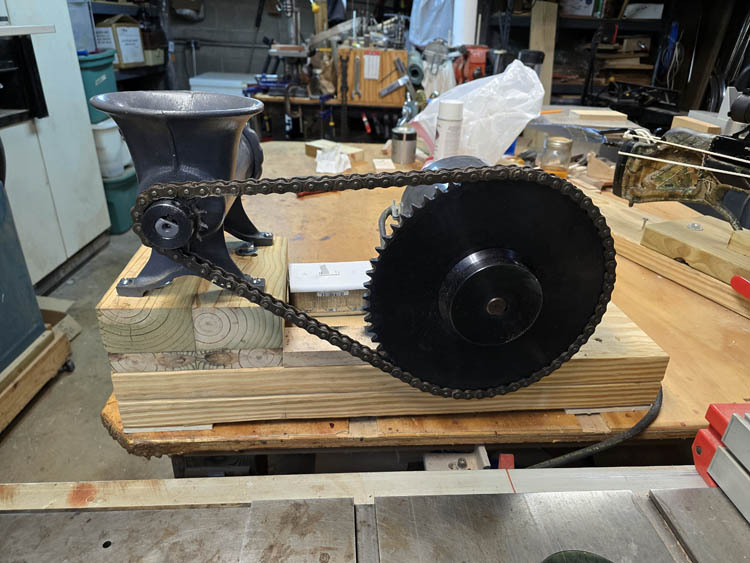
This base should not flex any under load from the high torque of the
motor/gear box.
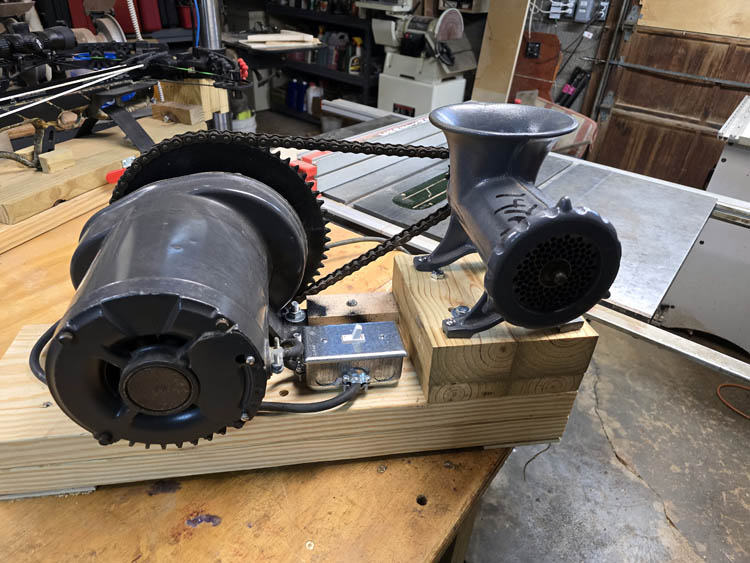
I obtained a matching cover plate for the switch box and had to move it
forward about half an inch for clearance.
There was no any flex that I could detect in the grinder and will
test it out on the next deer harvest. As stated earlier, I will
probably
add a safety guard for the exposed sprockets and chain with a
wood frame that is easily detachable since I need access to the grinder
feed auger sprocket to remove it for cleaning.
I might need a small crane to move this Frankenstein meat grinder around;
grin if you must!
Web page updated by Bill aka Mickey Porter on 12-04-2024 and
12-05-2024.
INSTALLED SAFETY GUARD AND PAINTING
I fabricated a simple rectangular wood frame safety guard using
ripped down 2x8 strips, mitered the ends and installed 3/8 inch diameter
wood dowels hidden in each corner. Since the sprockets and chain
were proud of the base, I had to drill a recess for said chain and
sprockets using a Forstner drill bit and drill press. I then painted the frame of the
safety guard yellow and also painted the wood portion of the meat
grinder base with black enamel paint. Clear acrylic material was
then fitted to the outside of the safety guard which was completed
before the safety guard was painted yellow. The Chop-Rite hopper is the
major safety hazard present since it is possible to get your fingers into
the feed auger, therefore extreme caution must be observed at all times
when placing meat into the hopper and best to use a push stick when
needed.
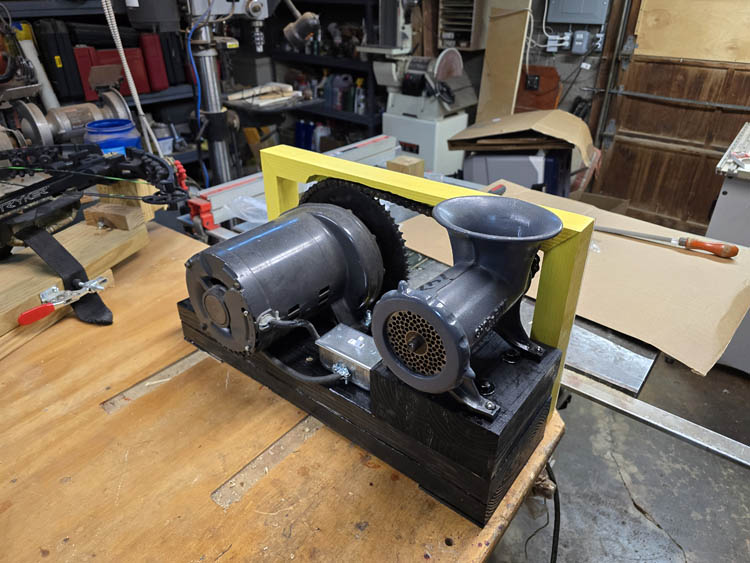
You can see the recess excavated out of the frame for the chain and
sprockets. I will put my thinking cap on and see about enclosing the
entire chain and sprockets with the clear acrylic, however it will have
to be able to detach from the safety guard frame since the entire frame
has to move away from the base when it is time to remove the meat feed
auger from the grinder housing for cleaning.
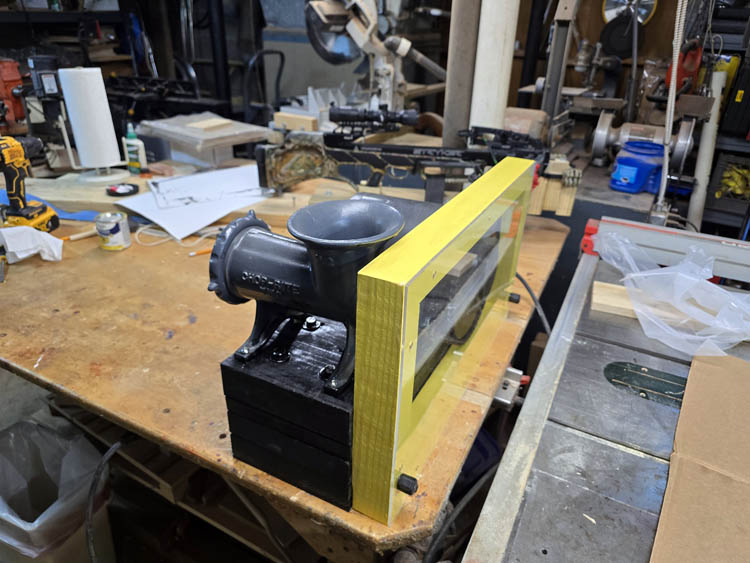
To remove the safety guard, unscrew the threaded 1/4 x 20 TPI rods
which have a Tee knob glued to the end and it easily detaches from the
grinder base.
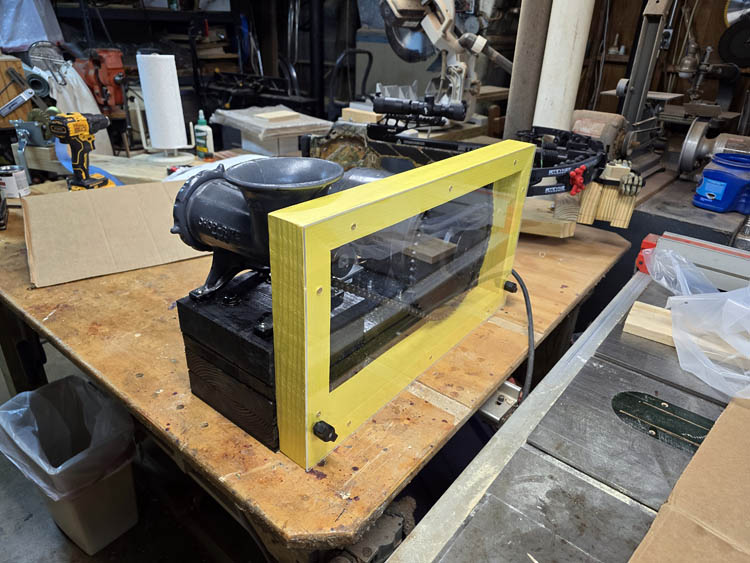
Hopefully, will get to use Frankenstein
with this modification before our 2024 big game hunting season ends.
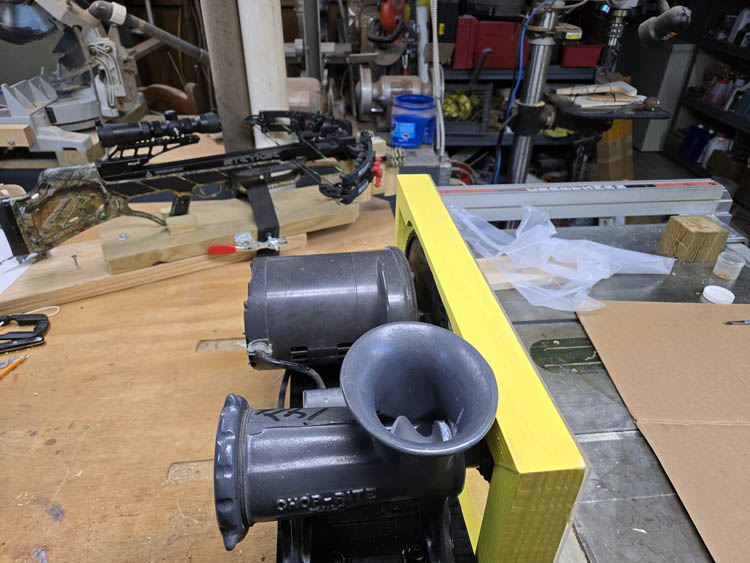
This will be the position of the meat grinder when in operation and
the guard does a good job of keeping your hands away from the chain and
sprockets, although not foul proof!
I am looking forward to using
Frankenstein meat grinder in the near future with the
next deer harvested.
Web page updated by Bill aka Mickey Porter on 12-12-2024.
INSTALLED ADDITIONAL SAFETY GUARD

I installed a safety guard on the inside of the safety guard frame
using the same acrylic sheet material and had enough left over to
finish this project. Your fingers and hands are totally isolated
from the sprockets and chain. I have a couple Tee knobs with a 1/4
x 20 TPI threaded rod securing the acrylic panel to the safety guard frame,
however I have a screw attached through the acrylic sheet and into the grinder base
block that keeps the acrylic in position once I remove the two Tee
knobs.
When removing and cleaning the feed auger, I will first
remove the two Tee knobs located on the top of the safety guard frame
and then remove the two Tee knobs on the lower outside of the safety
guard frame and pull the guard frame away from the grinder and base.
I will then loosen the two set screws on the feed auger sprocket and
pull the auger from the grinder housing for cleaning as stated earlier.
This is not as convenient as a regular self contained meat grinder
where you simply loosen one knob or move a lever upward to disengage the
grinder head mechanism from the meat grinder motor/gear box, but this is
doable and I have a powerful grinding machine.
Web page updated by Bill aka Mickey Porter on 12-14-2024.
ROBERT WEBSTER FRANKENSTEIN MEAT GRINDER # 1
I was talking recently with Robert Webster of Hamlet, NC and he read
my short story about my Frankenstein Meat Grinder and said he might have
the original version and sent me some pixs, of which I am going to add
to this page.
One thing Robert is good at is making things that are certainly
functional and many times do not go beyond that and this is a good
example. He said he recycled a metal stand he got from me, so I
guess some of myself might be in this one, whether or not I want to
admit it; grin if you must!
Robert's Dad which I call "Daddy Rab"
has a geared motor or two and Robert used one of them and purchased a #
32 manual meat grinder from Tractor supply and put his contraption
together which will be manifested by the pixs below:
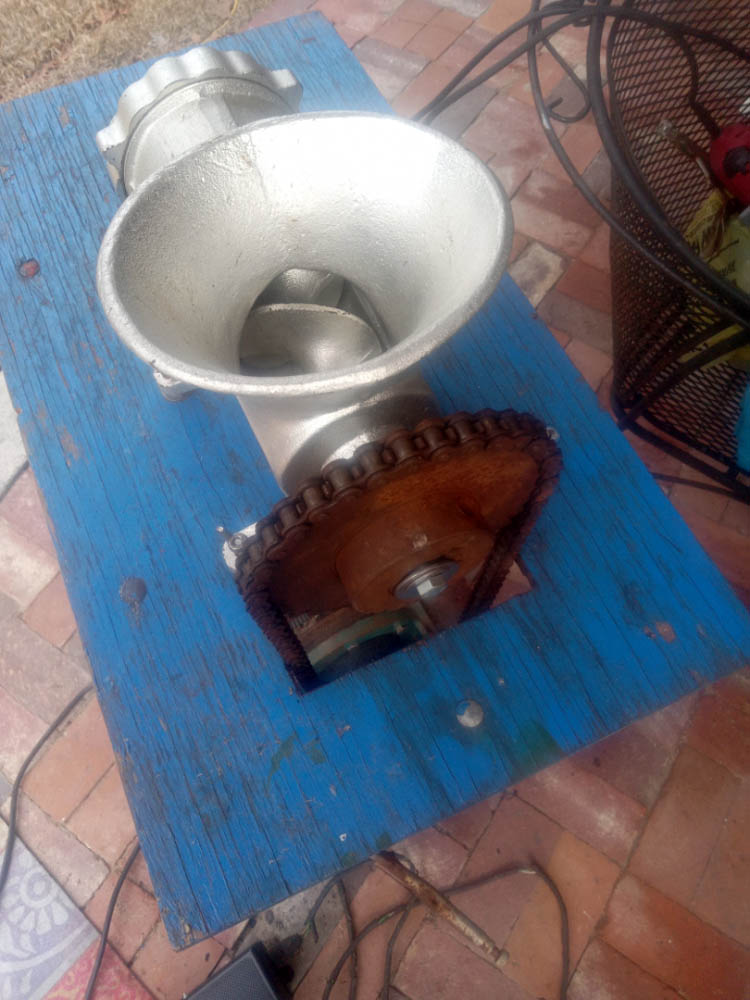
Robert said he will probably put a spacer between the grinder and the
board to elevate it for deeper freezer lugs/pans.
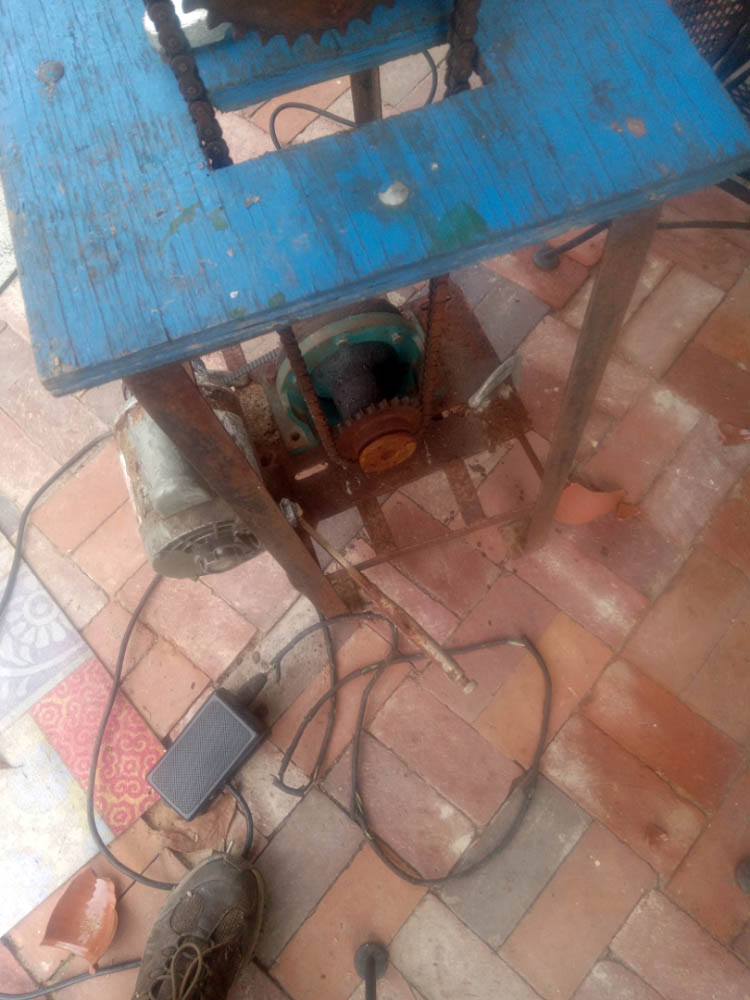
He has the motor/gear box base temporarily clamped down to the metal
aquarium metal stand. Looks like some mutant rats has gotten hold
of the power cord to the motor/gear box too!
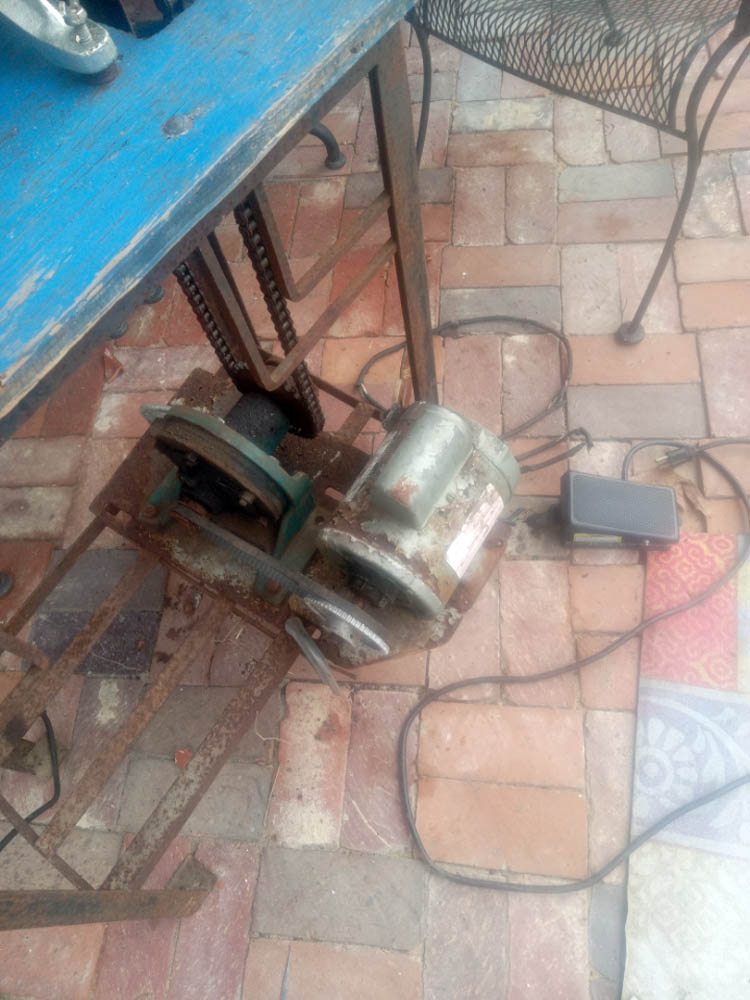
Remember, I used one of Robert's own words to describe this thing
being functional.
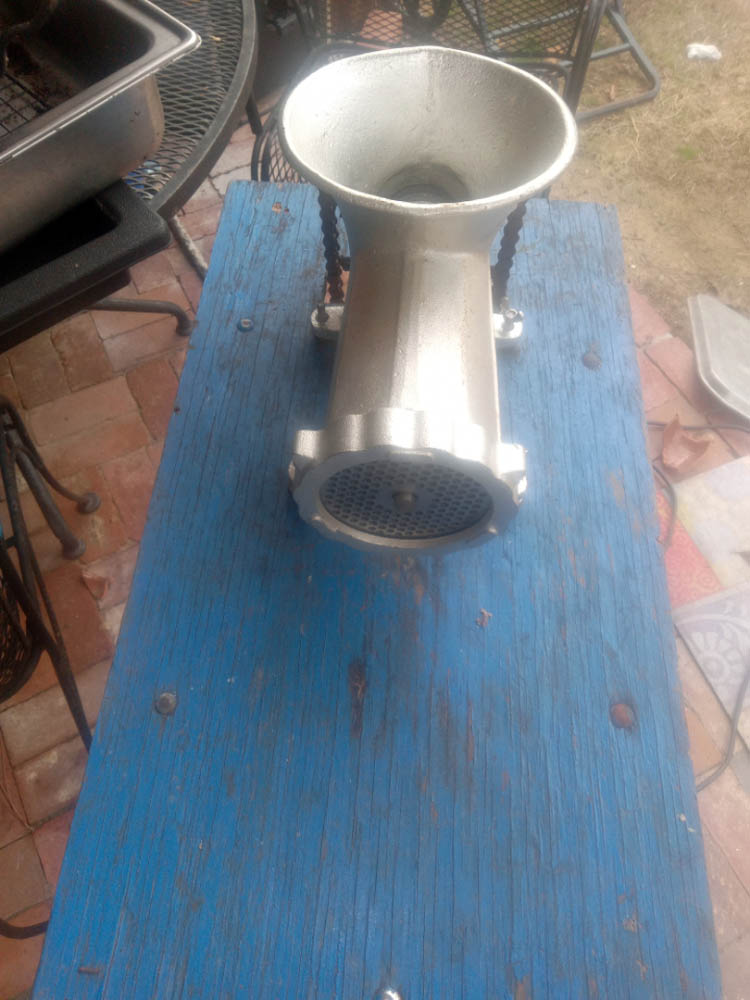
Robert said he has used the above grinder for at least five (5) years
and it does a great job of grinder meat and you don't have to cut the
meat into small pieces or chunks since the grinder has plenty of power
to get the job done. He was also thinking about adding a spacer
underneath the grinder head where he can use a deeper pan under it.
I must admit, that Robert has taken the Frankenstein Meat Grinder
Award of the Year away from me on this one. He did say he
might spruce it up some, cleaning and painting the motor/gear box and
adding some metal over the wooden portion of the table top.
Web page updated by Bill aka Mickey Porter on 03-02-2025.
LEAVING ON A
SPIRITUAL NOTE
If you do not know Jesus Christ as your Lord and Savior, please take
this moment to accept him by Faith into your Life, whereby Salvation
will be attained.
Ephesians 2:8 - 2:9 8 For by grace are ye saved through
faith; and that not of yourselves: [it is] the gift of God: 9 Not of
works, lest any man should boast.
Hebrews 11:1 “Now faith is the substance of things hoped for,
the evidence of things not seen.”
Romans 10:17 “So then faith cometh by hearing, and hearing by
the word of God.”
Open this
link about faith in the King James
Bible.
Romans 10:9 “That if thou shalt confess with thy mouth the
Lord Jesus, and shalt believe in thine heart that God hath raised him
from the dead, thou shalt be saved.”
Open this
link of Bible Verses About Salvation,
King James Version Bible (KJV).
Hebrews 4:12 “For the word of God is quick, and powerful, and
sharper than any two edged sword, piercing even to the dividing asunder
of soul and spirit, and of the joints and marrow, and is a discerner of
the thoughts and intents of the heart.”
Romans 6:23 “For the wages of sin is death; but the gift of
God is eternal life through Jesus Christ our Lord.”
Romans 3:23 “For all have sinned, and come short of the glory
of God;”
Micah 6:8 “He hath shewed thee, O man, what is good; and what
doth the LORD require of thee, but to do justly, and to love mercy, and
to walk humbly with thy God?”
Philippians 4:13 "I can do all things through Christ which
strengtheneth me."


